Parallelizer: Align Polygons and Lines (QGIS Plugin)
A QGIS plugin that rotates polygons and lines so they run parallel to the nearest line or polygon edge: building footprints to streets or parcel boundaries, parking stalls to curbs, and similar. Use it as a batch Processing algorithm on whole layers, or as an interactive map tool: pick a reference feature on the canvas, then click a feature or drag a rectangle to rotate several at once.
Install from QGIS: Plugins → Manage and Install Plugins, search “Parallelizer” (plugin page).
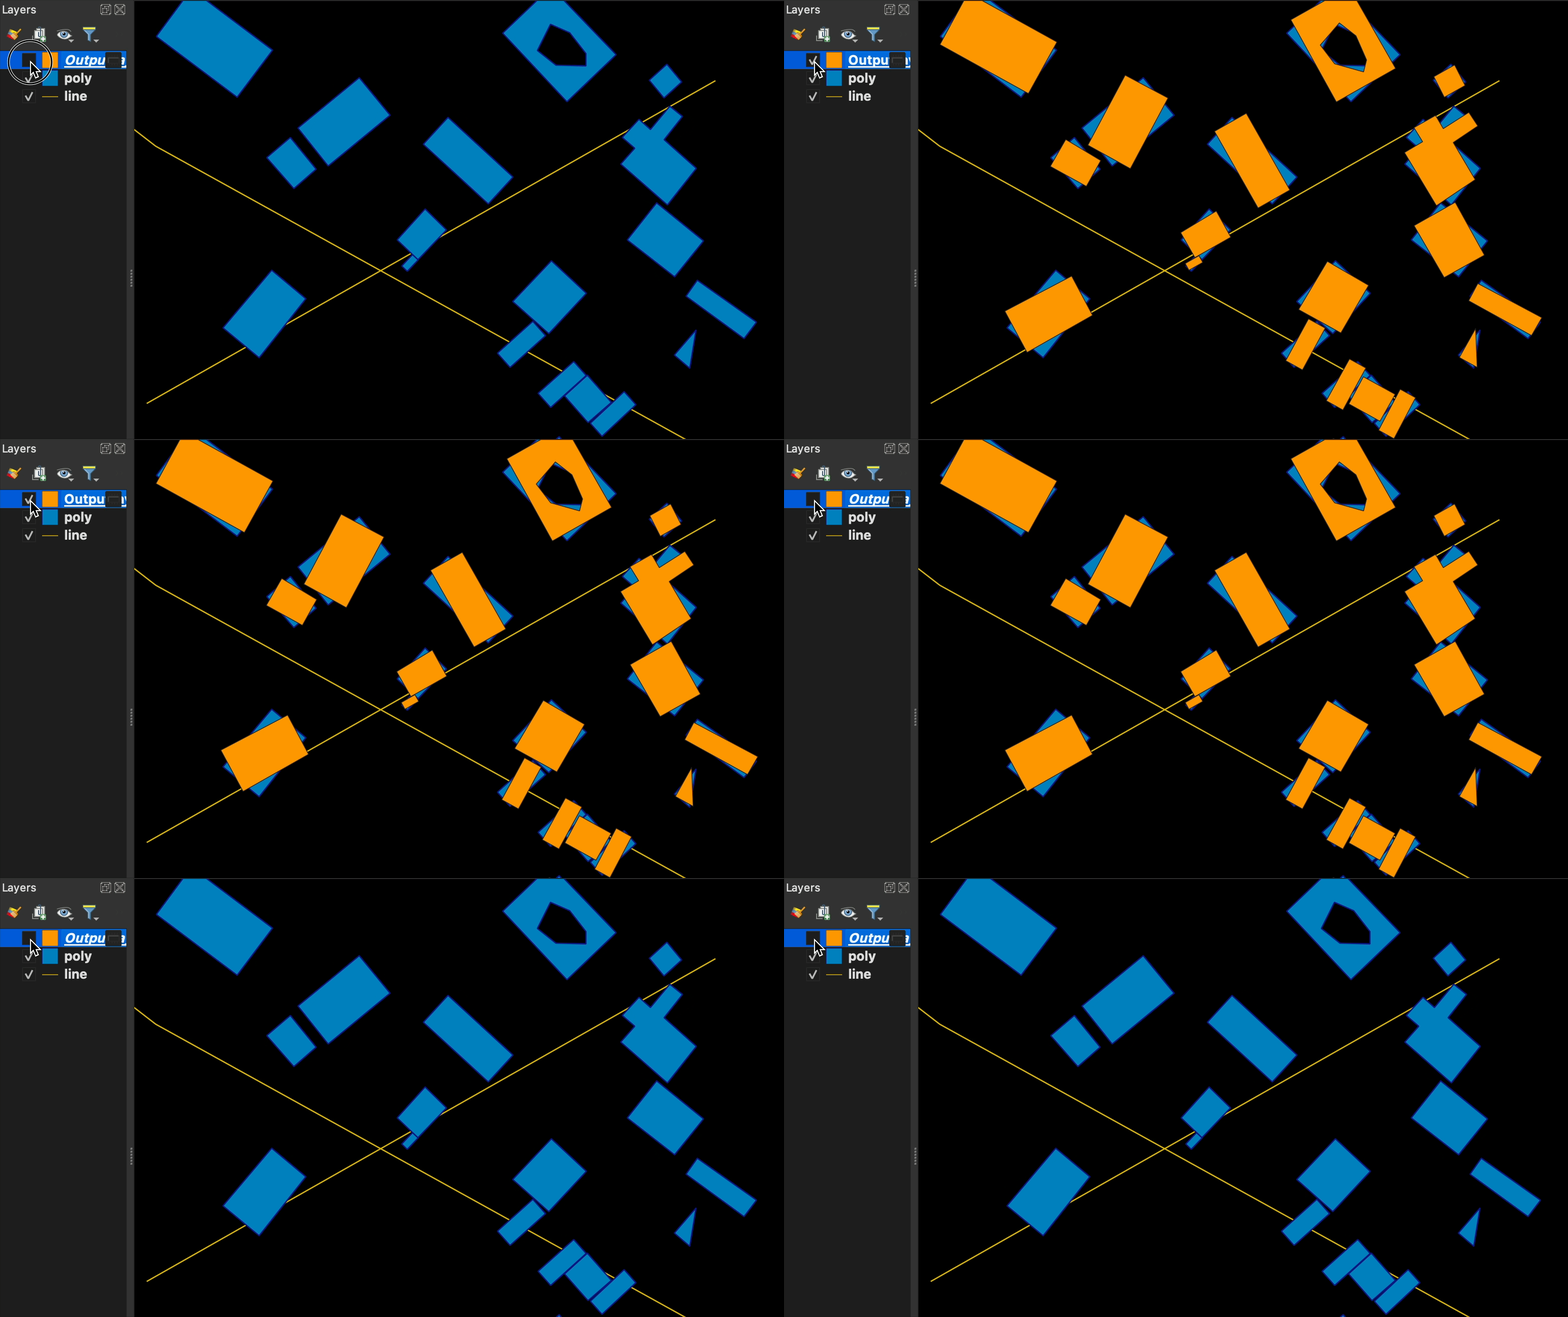
Table of Contents
- Installation
- Quick Start
- Features
- Algorithm
- Configuration
- Usage Examples
- Requirements
- Best Practices
- Development
- License
- Support
Installation
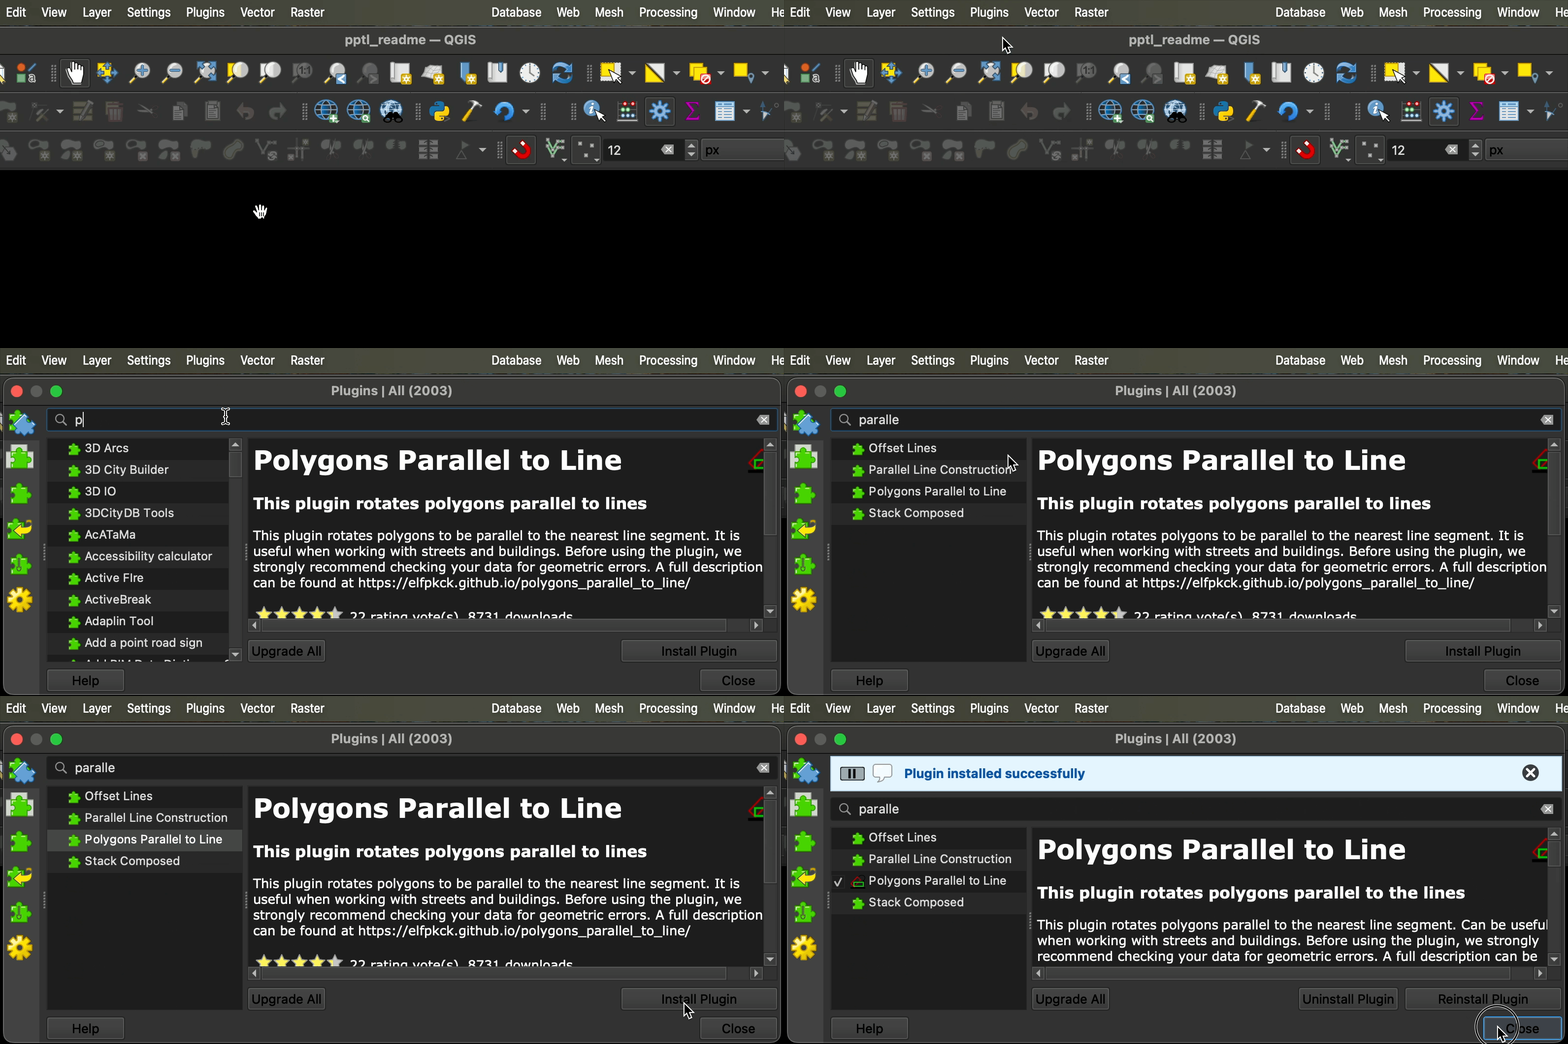
Method 1: QGIS Plugin Manager (Recommended)
- Open QGIS
- Go to Plugins → Manage and Install Plugins
- Search for “Parallelizer”
- Click Install Plugin
Method 2: Manual Installation
- Download the plugin from the QGIS Plugins Repository
- Extract to your QGIS plugins directory
- Restart QGIS and enable the plugin
Quick Start
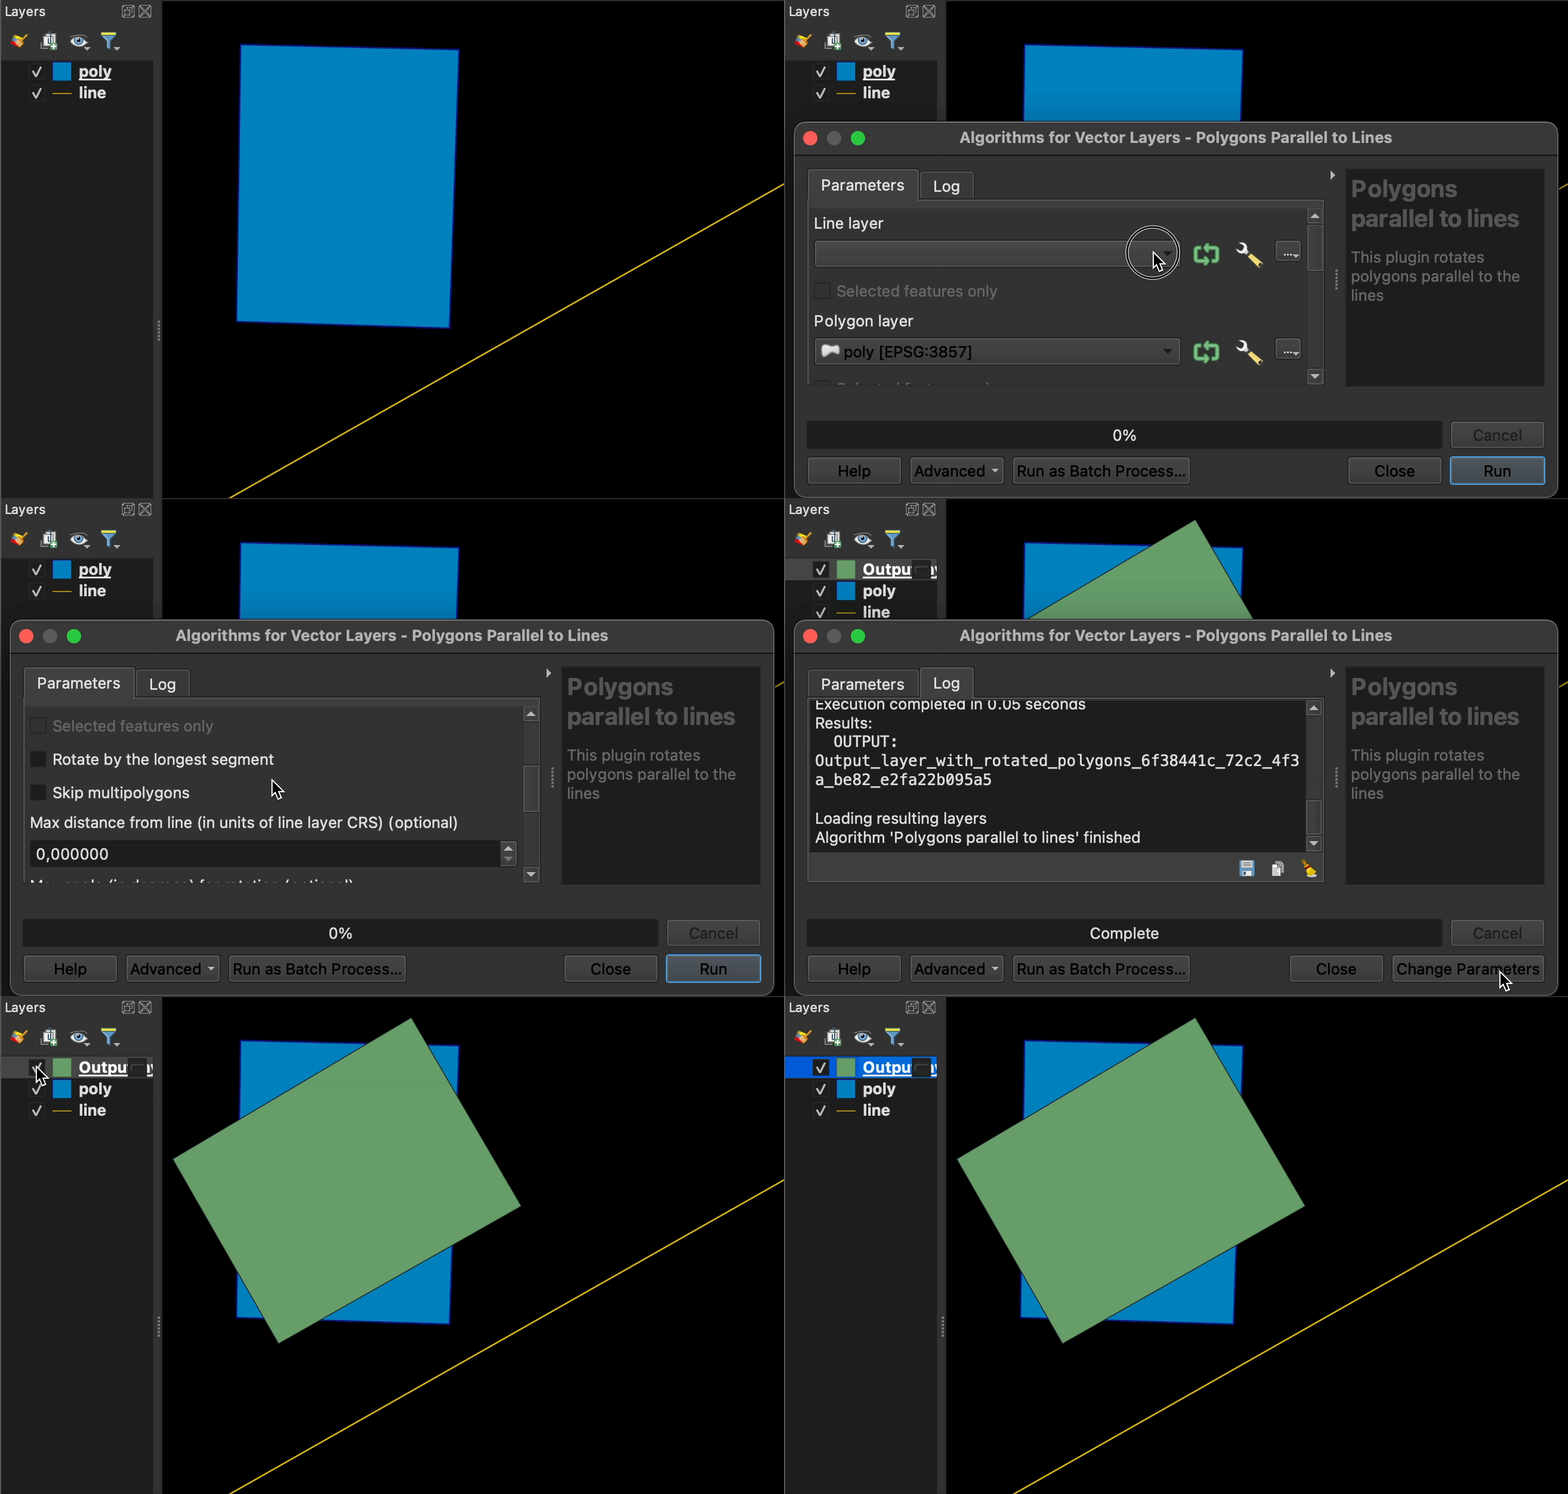
Batch (Processing algorithm)
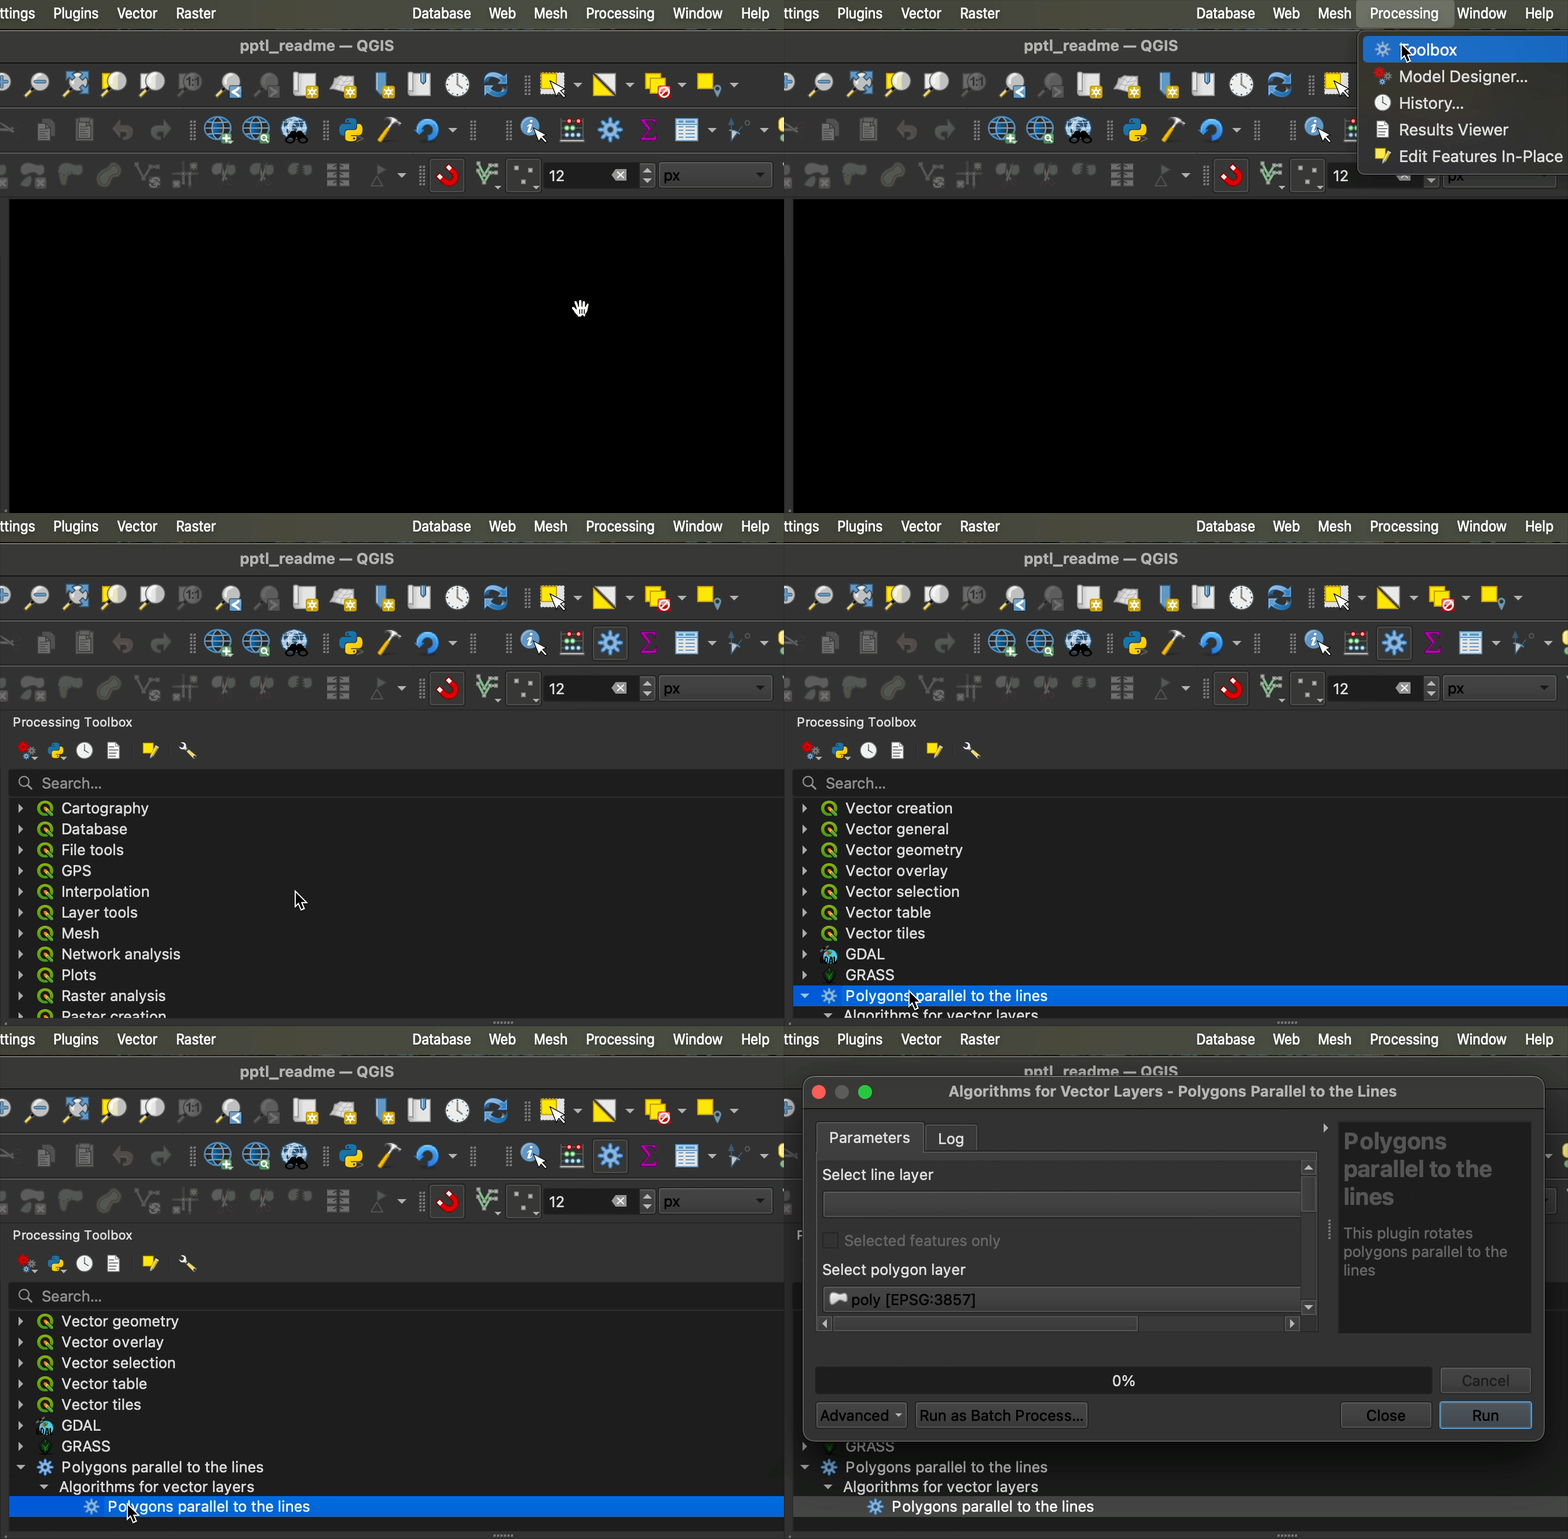
- Access the Plugin: Go to Processing → Toolbox → Parallelizer
- Select Input Layers: Choose your target layer (line or polygon) and a reference layer (line or polygon)
- Configure Parameters: Set distance and angle thresholds as needed
- Run: Execute the algorithm to generate aligned features
Interactive (map tool)
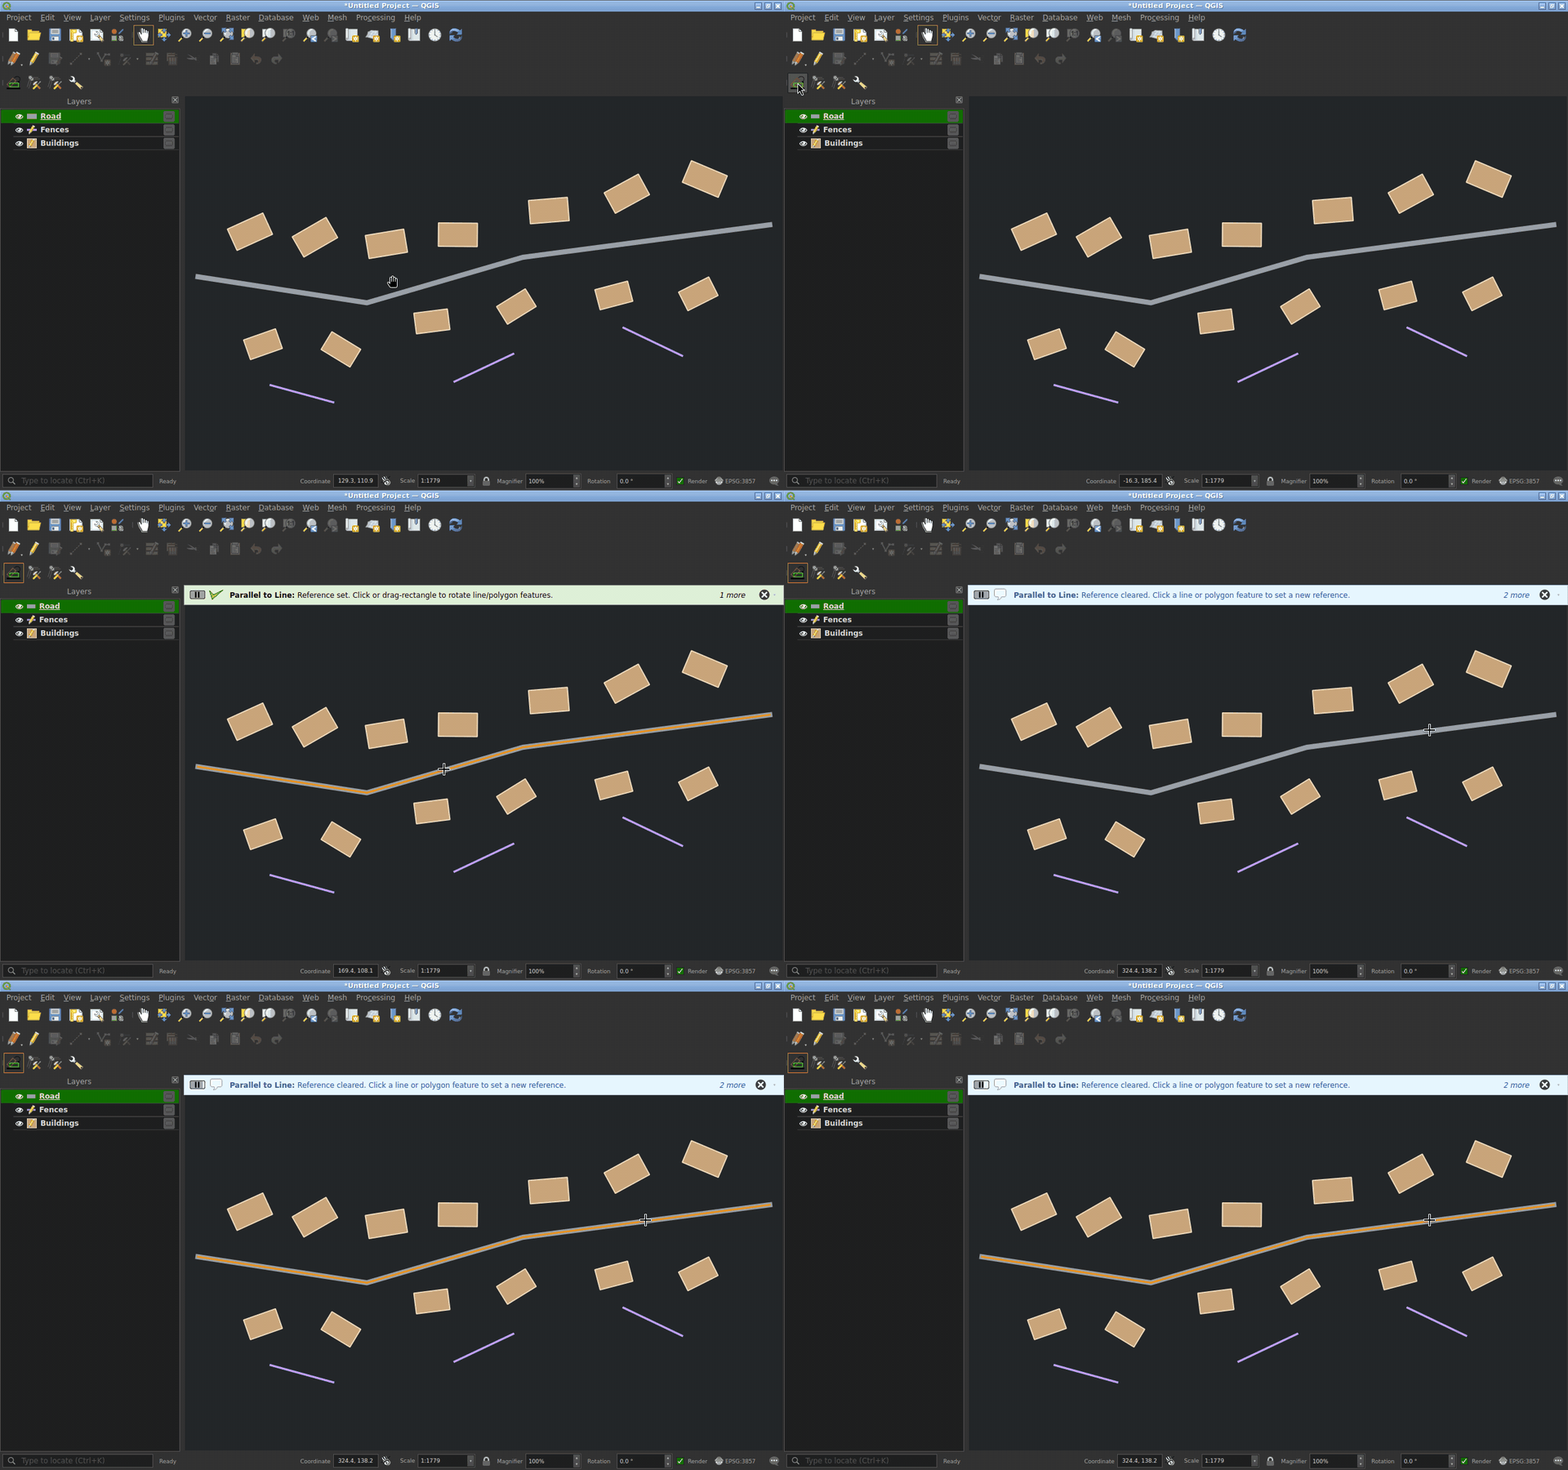
- Open the Parallelizer toolbar (also reachable from Vector → Parallelizer) and click the Parallel to Line (interactive) action.
-
Click a line or polygon feature, or drag a rectangle over one, to set it as the reference. The reference is highlighted on the canvas (polygons get an outline plus translucent fill); if both a line and a polygon are under the click, the line wins.
-
Toggle editing on the layers you want to modify, then click a single line/polygon to rotate it…
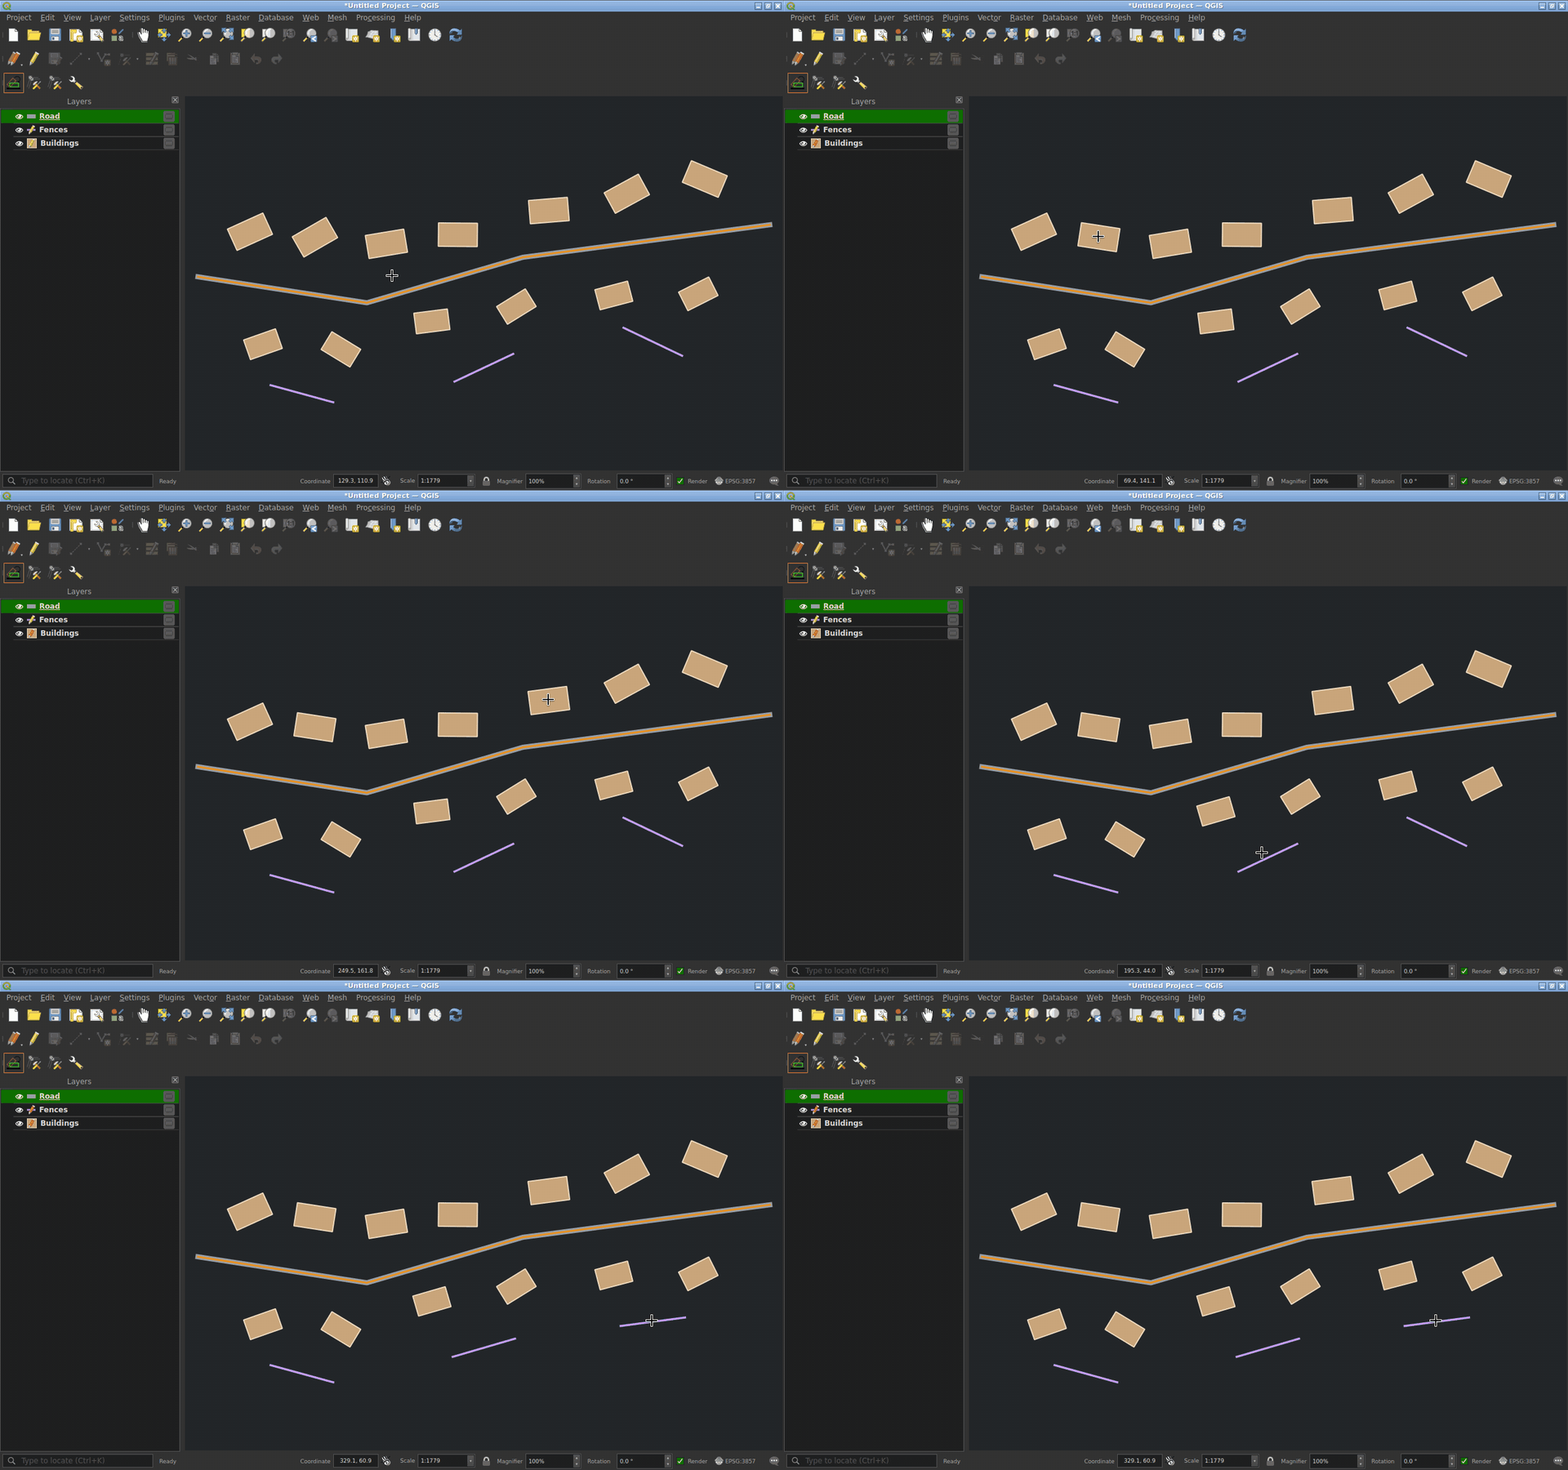
…or drag a rectangle to rotate every line/polygon feature that intersects it across all editable visible layers.
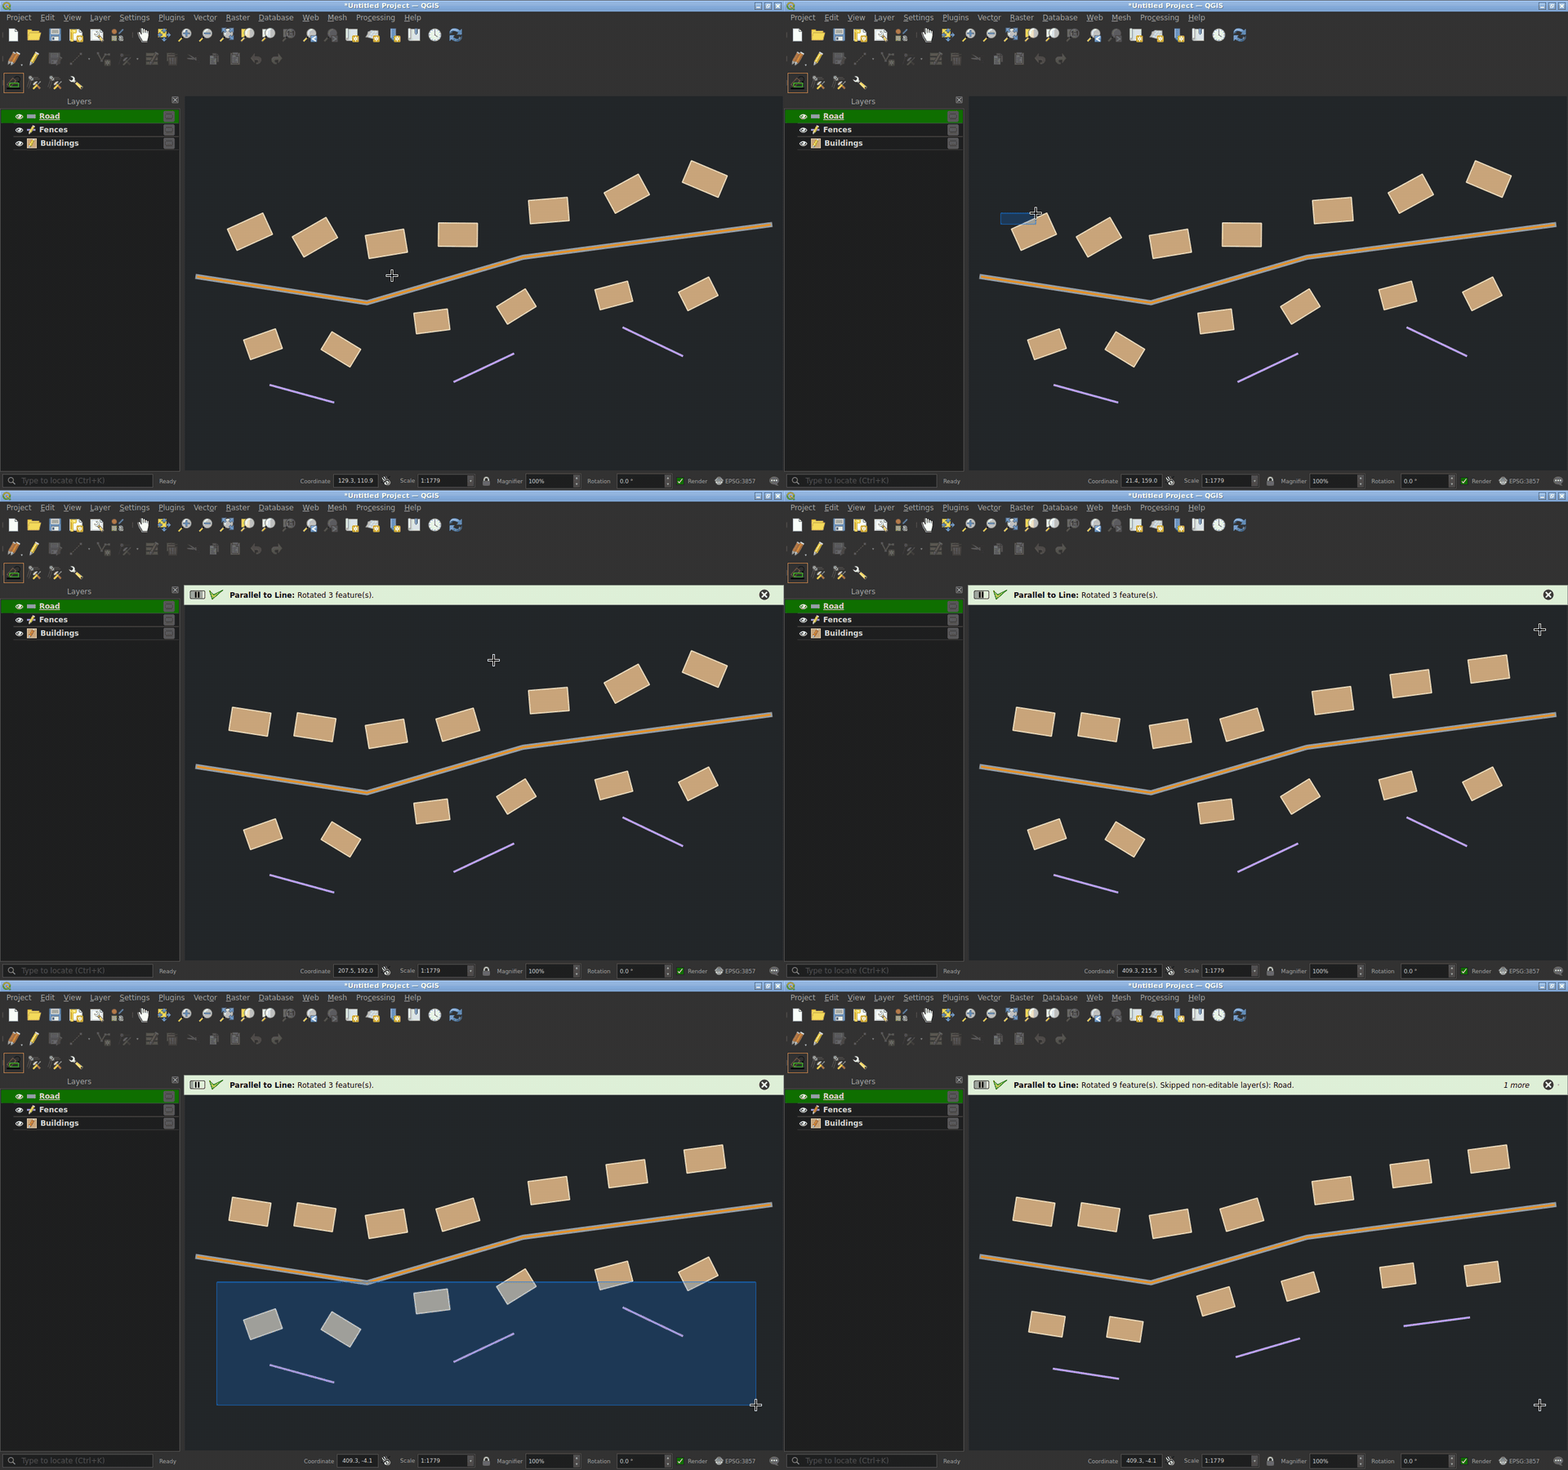
-
To align to one specific segment instead of the nearest one, turn on Pick reference segment (the reference becomes the segment you click) and/or Pick target segment (the target edge you click is the one made parallel).
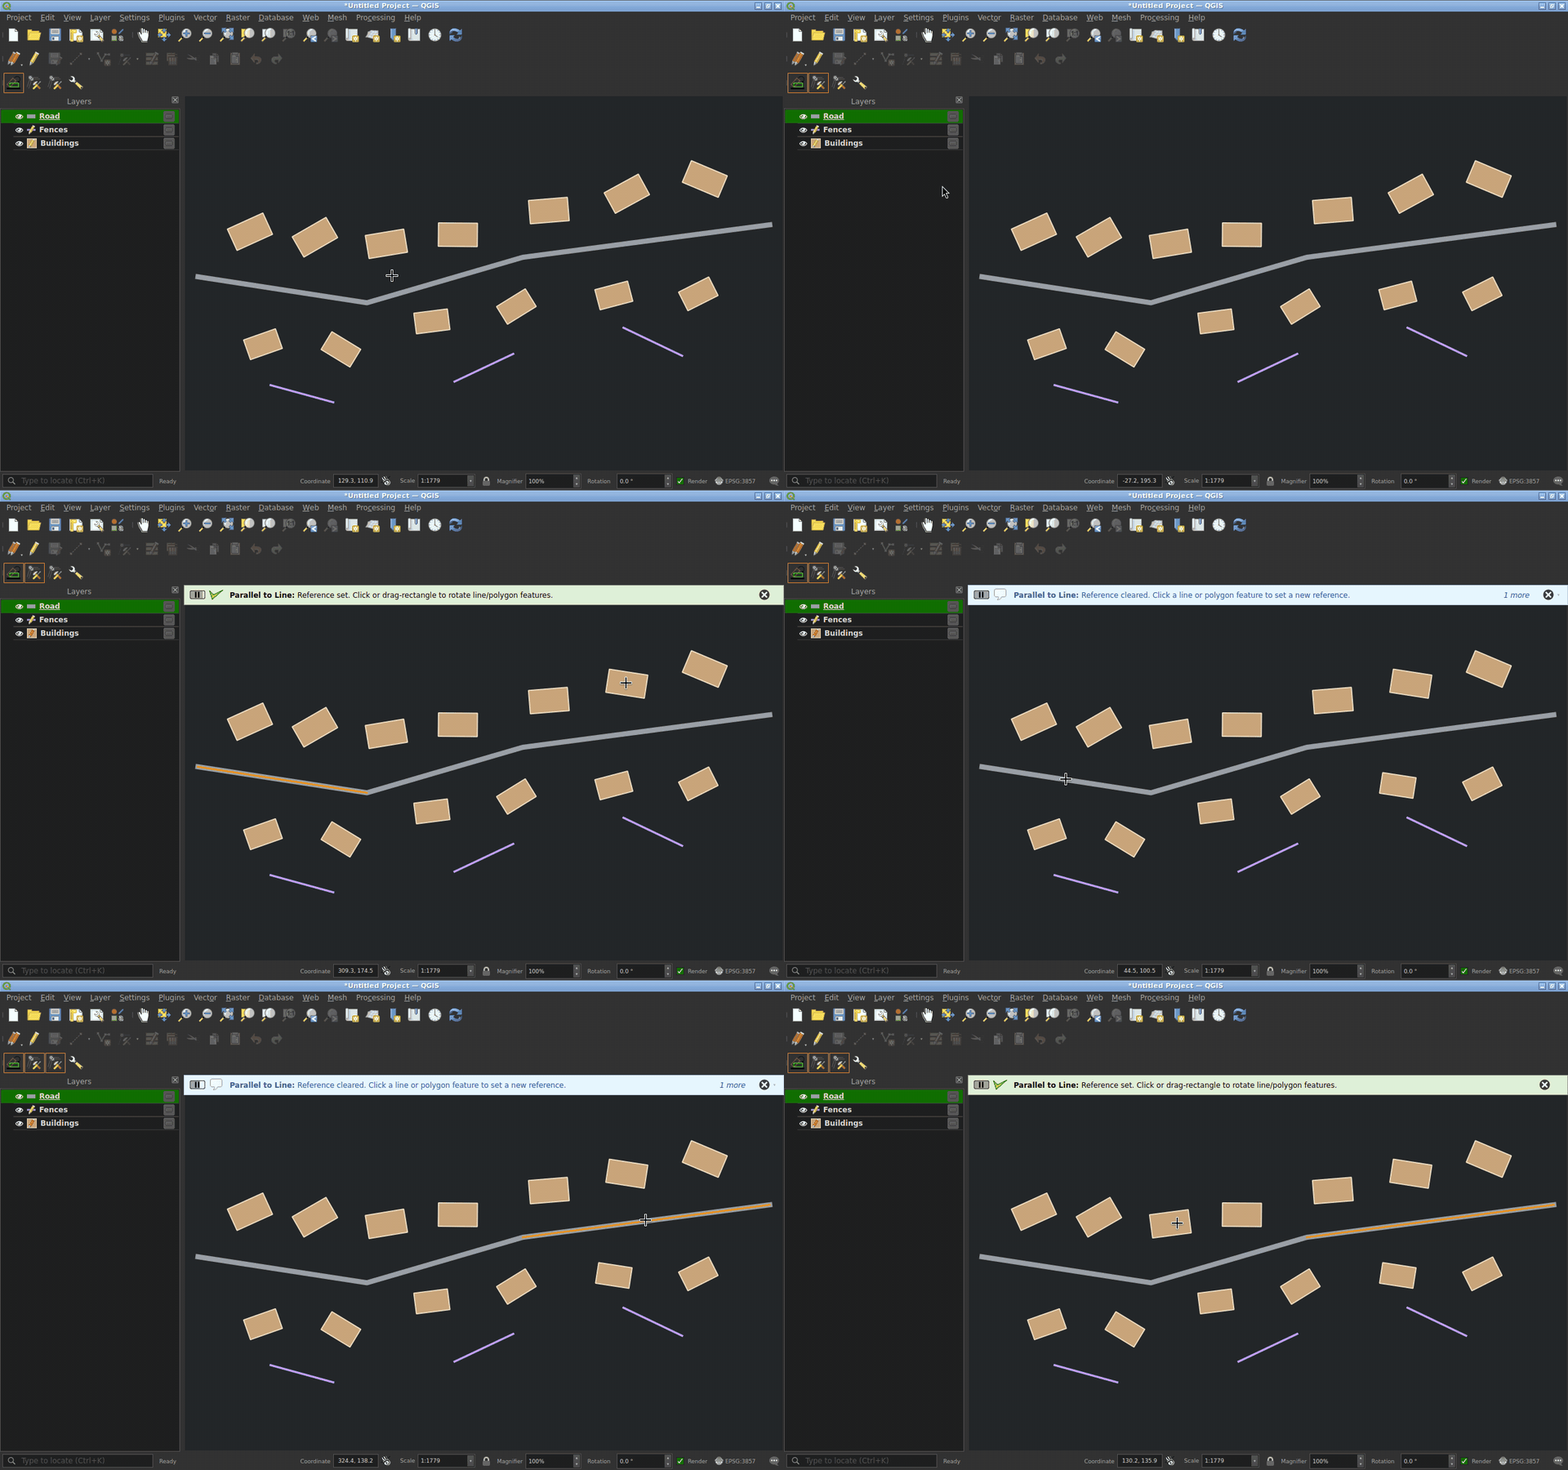
-
Use the Settings… action on the same toolbar to choose the rotation strategy (Rotate by longest segment) and the segment-picking modes. Settings persist via
QSettings.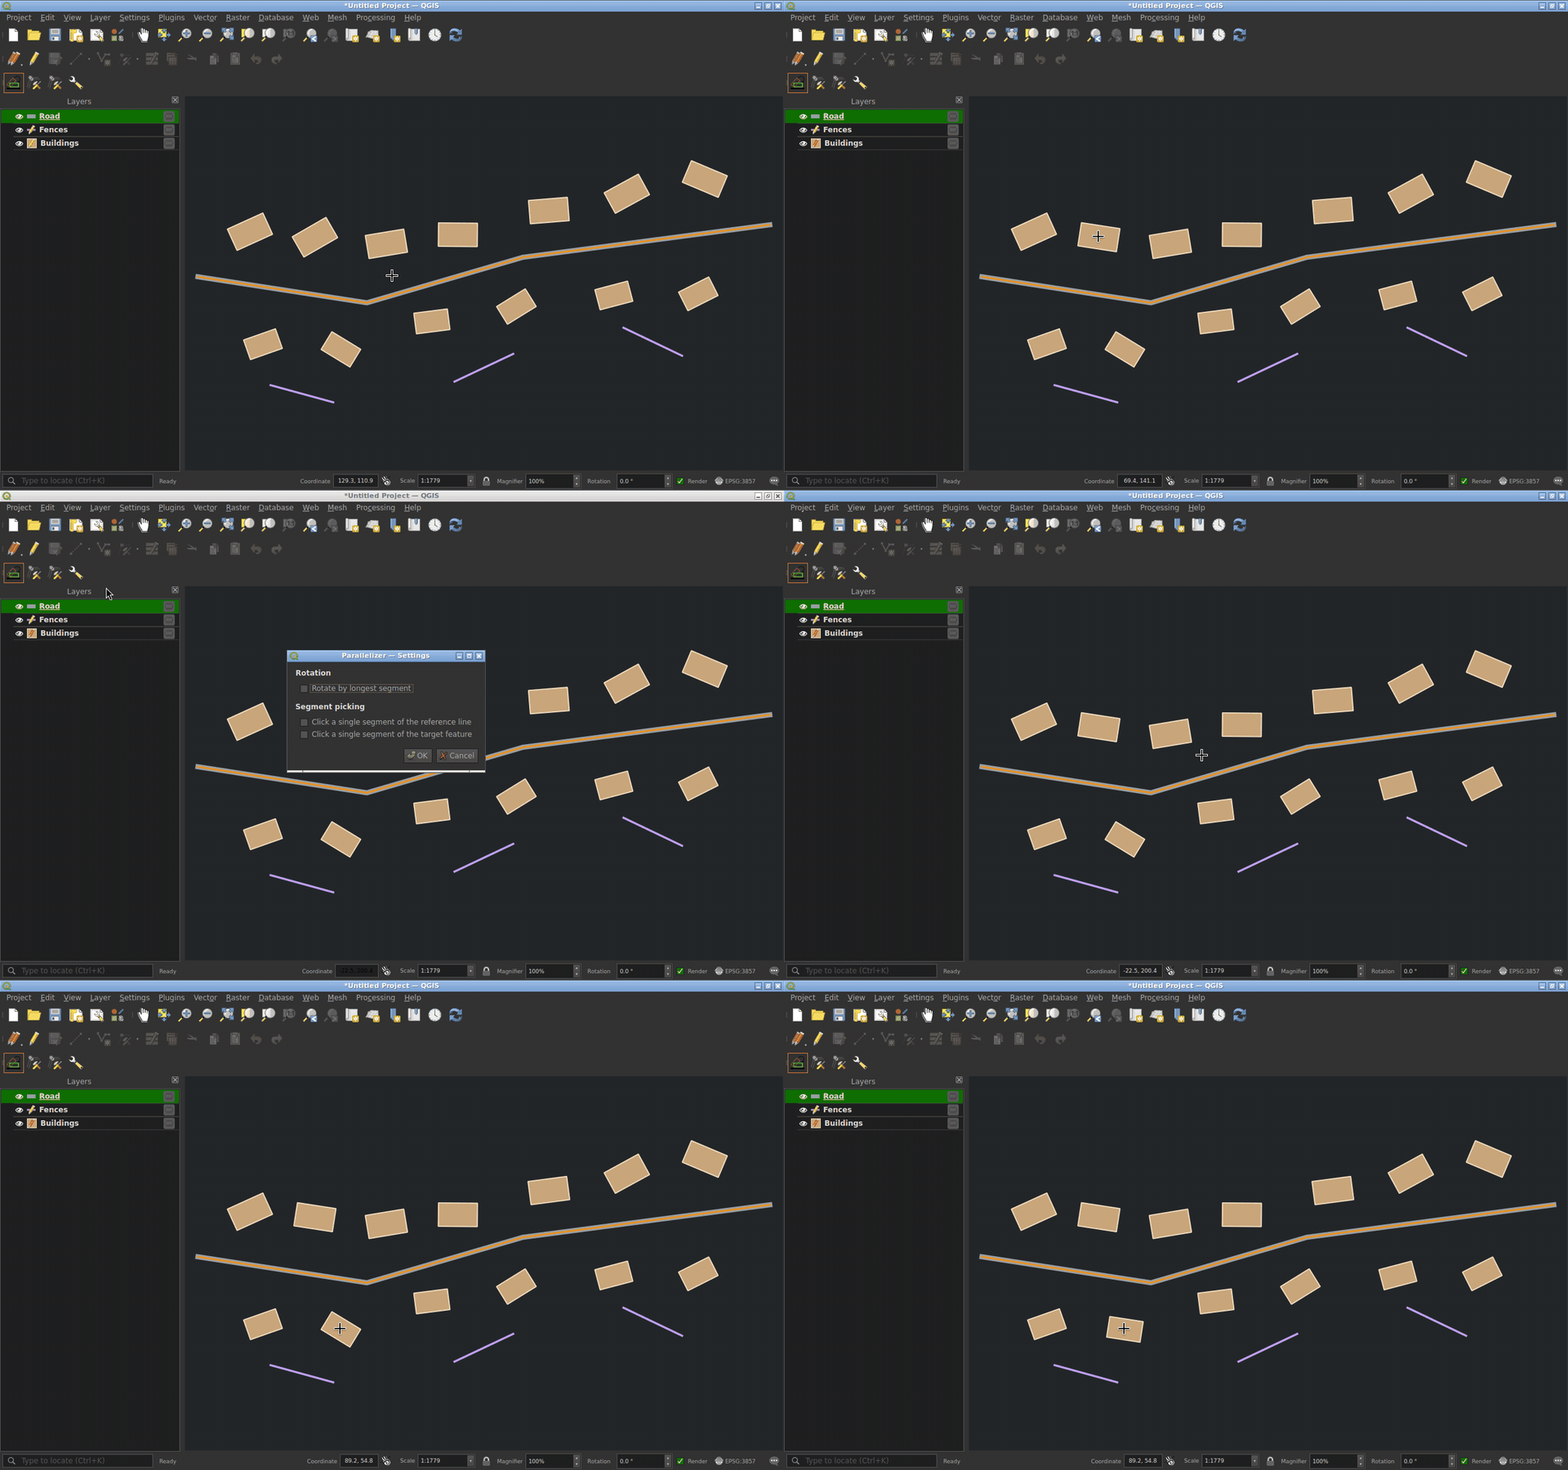
- Right-click or press Esc to clear the reference; press Esc again to deactivate the tool.
Features
- Two modes: batch Processing algorithm for whole layers, plus an interactive map-canvas tool for one-off rotations
- Automatic Rotation: Rotates polygons or lines to align with the nearest reference edge (line or polygon ring)
- Line-target support: both batch and interactive modes can rotate line features, not just polygons
- Bulk drag-rectangle: rotate every line/polygon intersecting a rectangle across all editable visible layers — wrapped per-layer in undo-able edit commands
- CRS-aware: reference and targets across layers in different CRSes are reconciled via
QgsCoordinateTransform - QGIS 4 / Qt 6 compatible: declared via
qgisMaximumVersion=4.99, with Qt enums fully scoped for PyQt6 - Distance-based Filtering: Optional maximum distance constraint (batch mode)
- Angle Threshold Control: Configurable angle threshold that gates which features are rotated (batch mode)
- Multipart Handling: Multipart features (multipolygons / multilines) are processed (or can be skipped) — see Keynotes for behavior
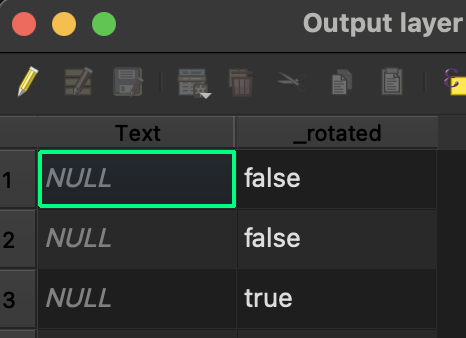
- Rotation Tracking: Adds a
_rotatedboolean field marking which features were modified (batch mode)
Algorithm
Polygon targets
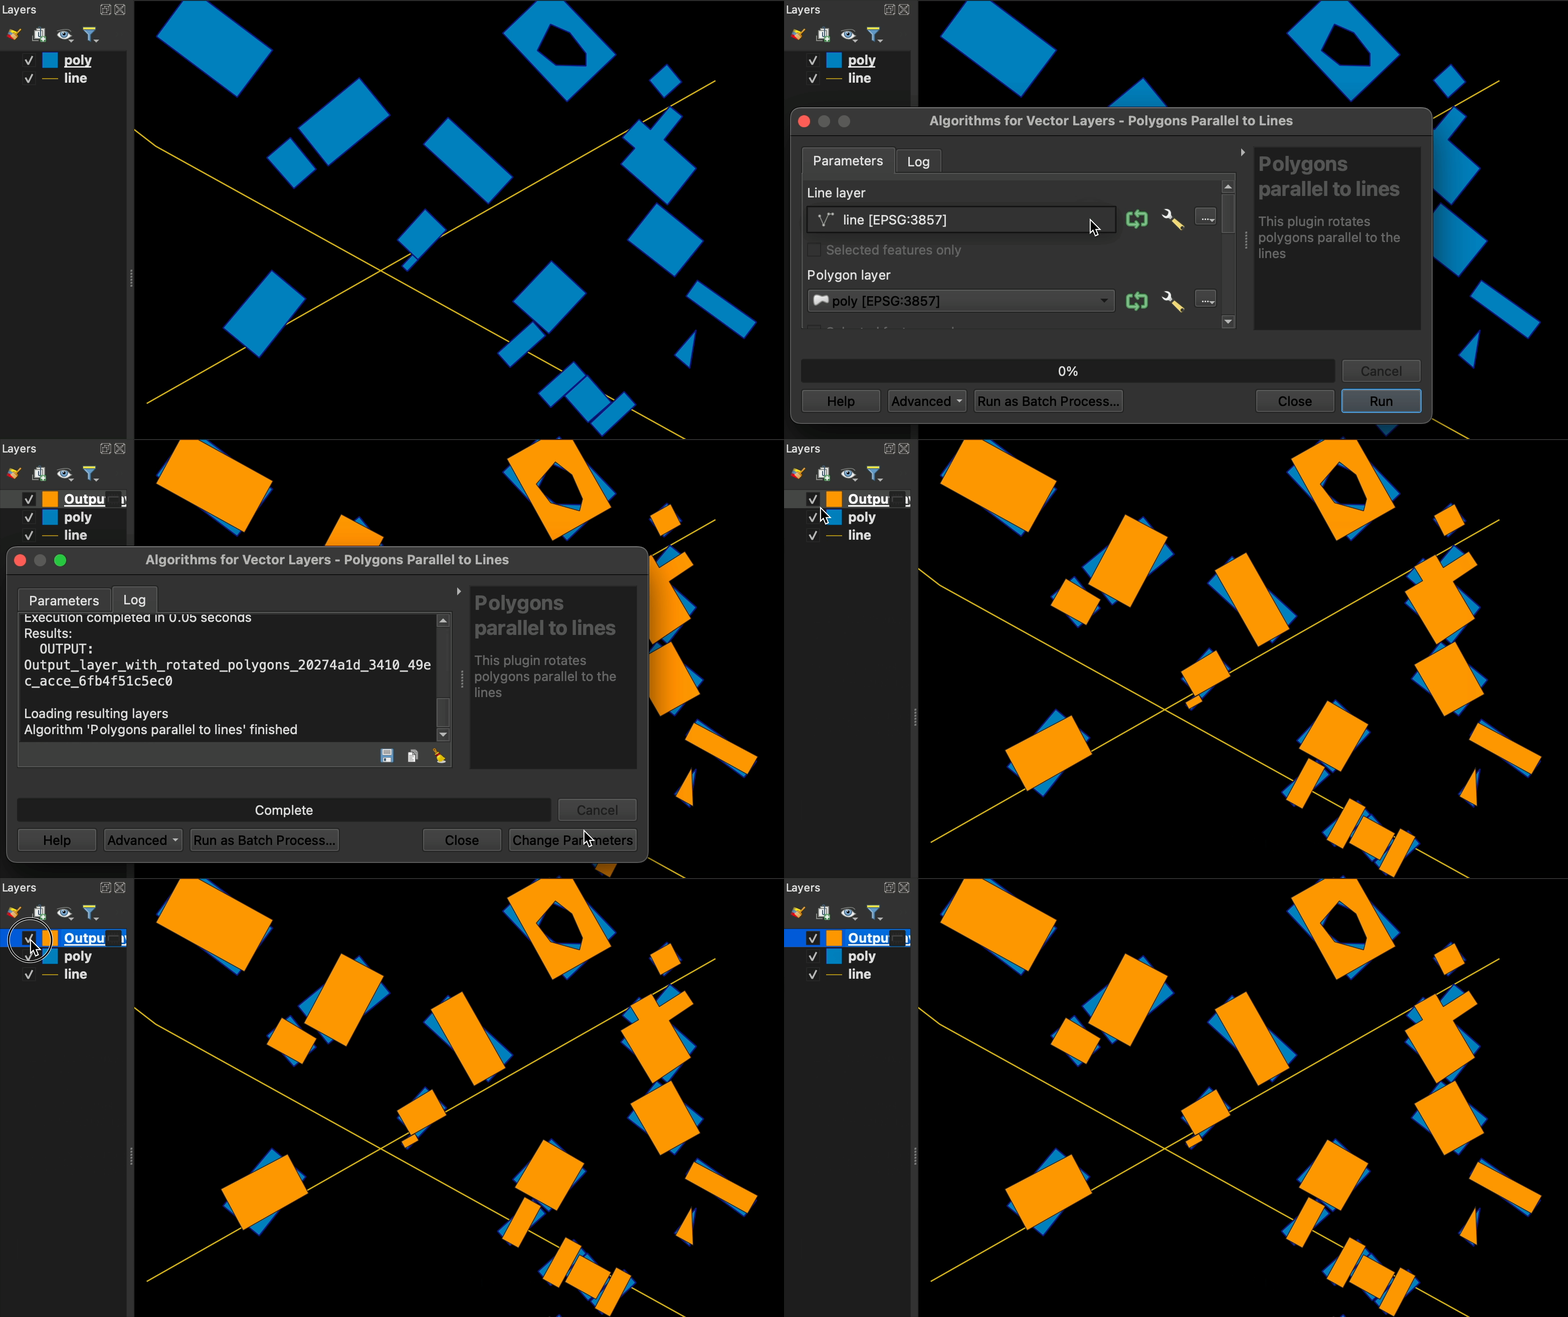
The plugin processes each polygon using the following steps:
-
Closest Reference Selection: Finds the reference feature (line or polygon) whose geometry is the nearest neighbor of the polygon centroid
-
Distance Check: If
Max distance from reference> 0 and the polygon-to-reference geometry distance exceeds it → skip rotation (note: when the target polygon overlaps the reference polygon, the distance is 0 and rotation runs even at small thresholds) -
Vertex Analysis: Identifies the polygon vertex closest to the nearest reference
-
Segment Evaluation: Takes the two polygon segments adjacent to that vertex
-
Angle Calculation: Computes the signed angle (delta azimuth) between the closest reference segment (any ring of a polygon reference counts) and each adjacent polygon segment
- Rotation Decision (each delta is compared against
Max angle):- If both deltas are within
Max angle:- Longest segment mode: Rotates by the delta of the longer segment (falls back to smallest delta if lengths are equal)
- Default mode: Rotates by the smaller delta
- If only one delta is within
Max angle: Rotates by that delta - If neither delta is within
Max angle: No rotation is applied - Rotations whose magnitude is effectively zero are skipped (avoids spurious
_rotated=True)
- If both deltas are within
- Output Generation: Writes the (possibly rotated) geometry with a
_rotatedboolean attribute
Line targets
For line targets, one segment of the target line is selected — the longest when Rotate by longest segment is enabled, otherwise the segment whose delta-azimuth to the closest reference segment is smallest. The whole line is rotated around its centroid by that delta, unless the delta exceeds Max angle (in which case no rotation is applied).
Keynotes
- Rotation center is the target feature’s centroid (for multipart features: the overall centroid of the whole multi-geometry)
- Interior rings and duplicate vertices are ignored when picking the rotation pivot for polygon targets, but they are preserved in the output geometry
- Multipart features are rotated as a single rigid body around the overall centroid by the angle chosen from the part that contains the closest vertex (polygons) or picked segment (lines) — individual parts are not aligned independently
- The
_rotatedfield indicates transformation status (boolean)
Configuration
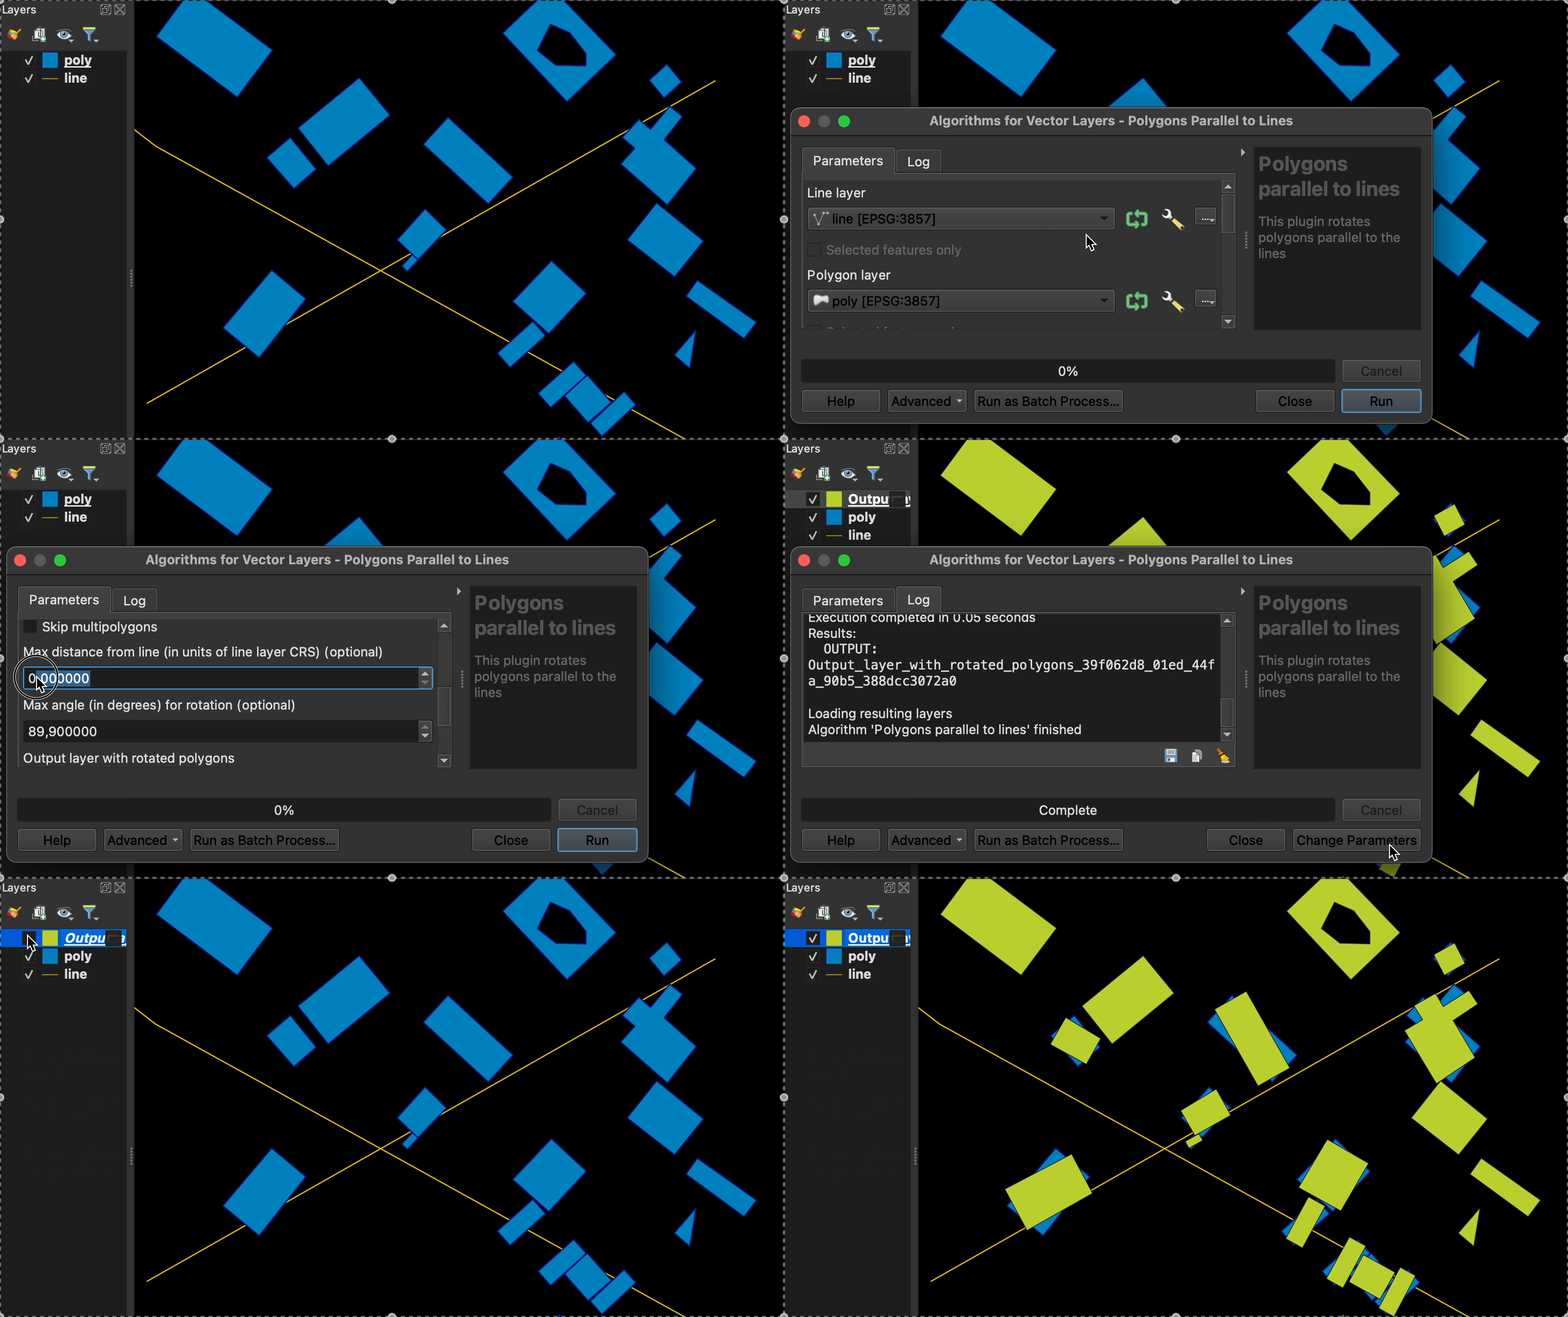
Max Distance from Reference
- Type: Float (optional)
- Range: ≥ 0.0
- Default: 0.0 (processes all features)
- Unit: Reference layer CRS units
When set to 0.0, all features are processed regardless of distance.
Max Angle for Rotation
- Type: Float (optional)
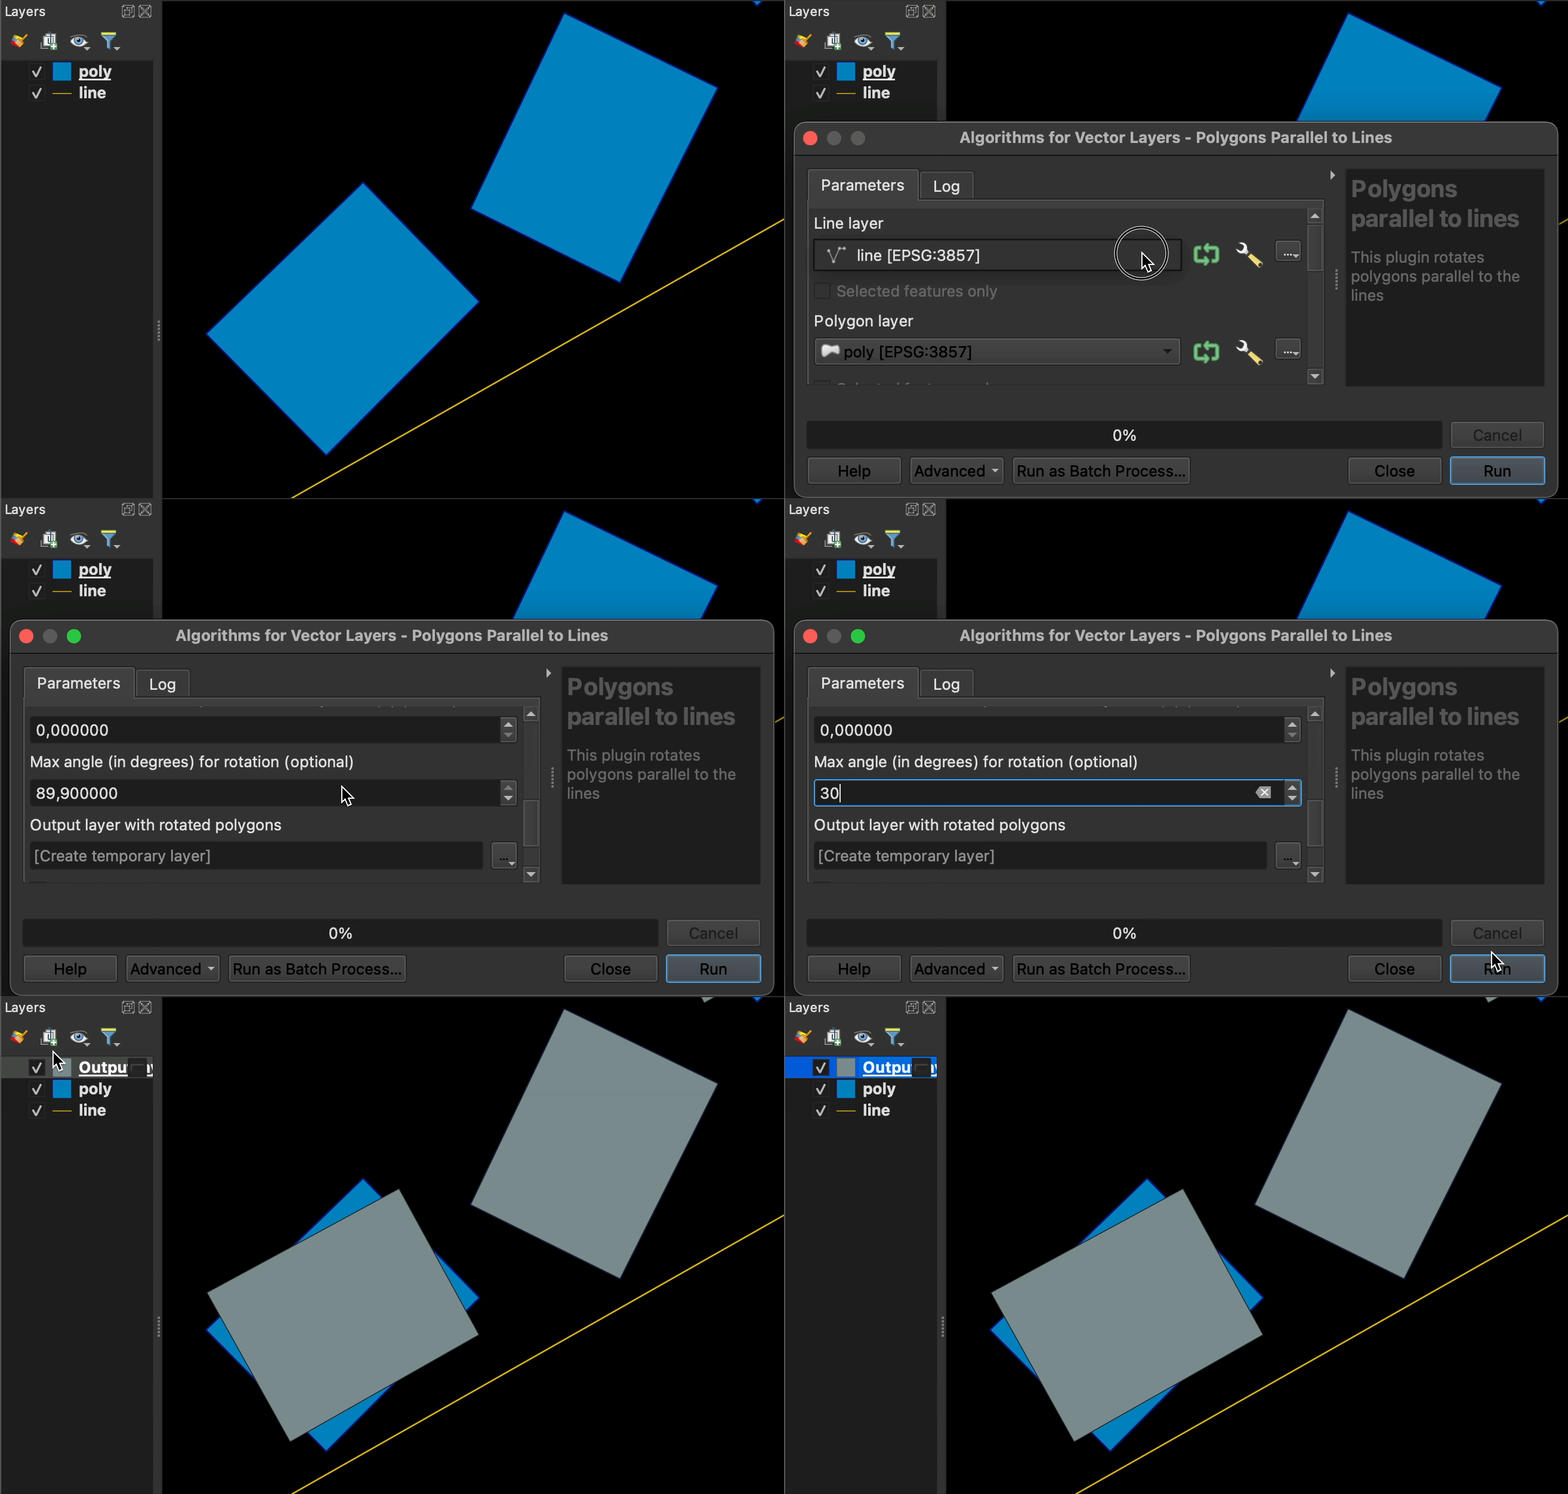
- Range: 0.0 - 89.9 degrees
- Default: 89.9
- Purpose: Threshold on the rotation angle (the delta azimuth between a target segment and the closest reference segment). A feature is only rotated when at least one candidate delta is within this threshold; otherwise it is left unrotated. For polygons the two segments adjacent to the closest vertex are evaluated; for lines a single picked target segment is evaluated. The applied rotation is bounded by this threshold.
Rotate by Longest Segment
- Type: Boolean
- Default: False
- Behavior: Prefer the longest segment when picking the rotation. For polygons this only kicks in when both adjacent segments are within Max angle (otherwise the in-threshold one wins); for lines the longest segment of the target is picked outright.
Skip Multipart Features
- Type: Boolean
- Default: False
- Purpose: When enabled, multipart features (multipolygons / multilines) are passed through to the output unchanged (with
_rotated=False) instead of being rotated. They are not removed from the output layer.
Usage Examples
Basic Usage
Input: Building polygons + Road centerlines
Output: Buildings aligned parallel to the nearest roads
Advanced Filtering
Max Distance: 50.0 (meters)
Max Angle: 45.0 (degrees)
Result: Only buildings within 50 m of roads, with rotation ≤ 45°
Requirements
- QGIS: 3.0 or higher (compatible with QGIS 4.x / Qt 6)
- Dependencies: Standard QGIS processing framework
Compatibility
- Windows
- macOS
- Linux
Best Practices
⚠️ Important: Validate and fix geometry errors before running the plugin for optimal results.
Recommended Workflow
- Prepare Data: Ensure target and reference layers are in the same CRS
- Fix Geometries: Use Processing Toolbox → Vector geometry → Fix Geometries
- Test Parameters: Start with default settings on a small dataset
- Batch Process: Apply to full dataset with optimized parameters
Performance Tips
- Use spatial indexes for large datasets
- Consider processing in smaller batches for huge datasets
- Test different parameter combinations on representative samples
Development
See DEVELOPMENT.md for detailed development setup and contribution guidelines.
License
Copyright (C) 2016-2026 by Andrii Liekariev
This project is licensed under the GNU General Public License v2.0 or later.
Support
Reporting a problem
When the plugin hits an unexpected error, a message with a Report a problem… button appears; you can also open it any time from Vector › Parallelizer › Report a problem…. It shows a report with:
- the plugin, QGIS, Qt, Python, GEOS, PROJ and GDAL versions, your operating system, locale and screen scaling, and the other active plugins
- the map tool settings
- the last error and recent Parallelizer log lines
- what the failed (or last) operation worked on, captured when it ran: project and canvas settings (coordinate systems, canvas rotation, snapping, topological editing), the reference and target layers (geometry type, coordinate system, provider, feature counts), the features (geometry type, parts, vertices, validity) and the rotation math (azimuths, segment lengths, chosen angle)
Layer names, file paths and coordinates are not included; paths to your home and QGIS profile folders are replaced automatically, and you can edit the text before sharing it. To help reproduce a problem, you can tick Include the geometries involved: this adds them as WKT moved so the first reference vertex is at 0 0, which keeps their shapes and relative positions but not their real location. Nothing is sent automatically: the report only leaves your computer if you use Send report (sends the text to the developer’s private report service; no account needed), Copy to clipboard, Open GitHub issue (a pre-filled issue in your browser, created only if you submit it; GitHub issues are public) or Send by email (a pre-filled message to the developer in your own mail app, sent only if you send it). See the privacy note.
The plugin also keeps a small log without layer names, file paths or coordinates: in the Log Messages panel under the Parallelizer tab, and in parallelizer/parallelizer.log inside your QGIS profile folder (Settings › User Profiles › Open Active Profile Folder).
Made with ❤️ for the QGIS community